How to Take Screenshot on Windows Desktop
Take Screenshot on Windows Desktop . It can be helpful if you want to show someone what you’re seeing on your screen or if you want to save a copy of something for later reference. Maybe you want to save directions from Google Maps so that you can refer back to them later. Nowadays, it’s the most significant concern of people to know how to take screenshots on windows desktops. But it is also necessary to buy the best desktop computers for students to work efficiently. In this article, we’ll provide you tips on how to take a screenshot on a windows desktop. Let’s dive deep into the topic!
Some people also want to know how to make desktop icons look aesthetic or how to delete remote desktop connection history.
How to Take a Screenshot on a Windows
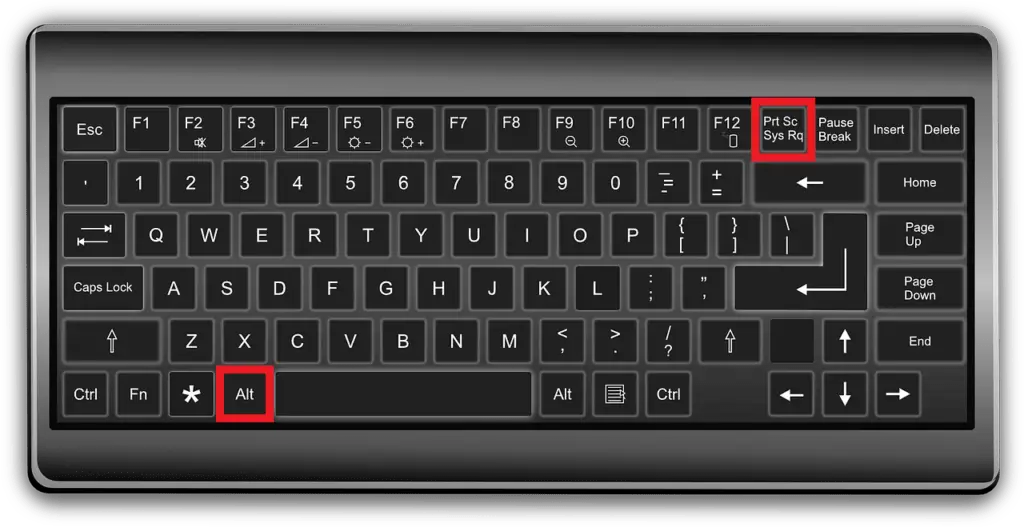
Taking screenshots on a Windows desktop is easy – press the Print Screen (PrtScn) button on your keyboard. You can also take screenshots of your active window by pressing the Alt key and the Print Screen button. You might need to hit the Fn key and the Print Screen button on some laptops to take a screenshot. You can also utilize the Windows logo key + PrtScn button shortcut to take a screenshot on a laptop. Let’s learn the complete methods of taking screenshots using these methods.
Guide to Take a Screenshot on Windows 10
In Windows 10, there are several ways to take a screenshot. Here are some easy tricks.
The Print Screen Button
The first method is to use the print screen button on your keyboard. The print screen button is usually located in the top right corner of your keyboard, next to the F12 key. To capture a screenshot, press and hold down the print screen button. Your computer will take a picture of everything on your screen.
You can paste the screenshot to Paint or Photoshop and save it as an image file. To do this, open up the program and press Ctrl+V (or Command on a Mac) to paste the screenshot. Then, click File> Save As and choose where to save the File.
The Snipping Tool
One more way to take a screenshot is by using the Snipping Tool. The Snipping Tool is a built-in program in Windows 10 that allows you to select any area of your screen and save it as an image file. To open the Snipping Tool, press Start and type “snipping tool” into the search bar. Then, click on the program’s icon when it appears in the search results.
When you open up the Snipping Tool, you’ll see an interface with four options: free-form snip, rectangular snip, window snip, and full-screen snip. For this example, we’ll use the rectangular snip option.
Saving the screenshot
To take a screenshot using this method.
- Click Rectangular Snip > New > drag your cursor around the area you want to capture and release your mouse button when you’re done selecting an area.
- Click Copy
- open up an image editing program like Paint or Photoshop
- press Ctrl+V (or Command+V on a Mac) to paste the screenshot into the program
- Click File > Save As and choose where to save the File.
How to Use the Game Bar to Take a Screenshot
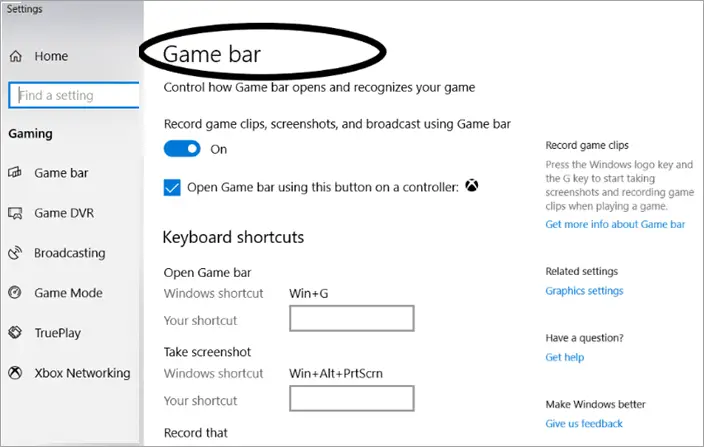
The Windows 10 Game Bar is a handy tool that allows you to take screenshots of your favorite games. Gaming features are not available for windows desktops. In this section, we’ll show you how to use the Game Bar to take a screenshot.
- Open the game you want to take a screenshot of.
- Press the “Windows key + G” to open the Game Bar.
- Click on the “Screenshot” button to take a screenshot.
- The screenshot will be saved in your “Pictures” folder.
How to Use Greenshot

The green shot is another popular screenshot tool available for free downloads for Windows 10/8/7 and macOS 10.9+. Greenshot has many features that are not available in Snipping Tool, such as being able to annotate your screenshots before saving them and taking timed screenshots (i.e., screenshots that are taken automatically after a set amount of time).
To take a screenshot using Greenshot:
- Download and install Greenshot from their official website if you haven’t already done so.
- Open Greenshot and click on Capture in the upper-left corner of the interface (or press Ctrl + PrintScreen on your keyboard).
- A drop-down menu will appear with three options: Freehand Region, Window, and Fullscreen. Choose whichever option best suits your needs; for example, if you want to capture only part of your screen, choose Freehand Region.
- It will highlight the selected region in red; press Enter (or left-click) when ready to take the screenshot. Use your mouse to adjust the selection before taking the screenshot.
- After taking the screenshot, it will appear in Greenshot’s main interface. From here, you can save it, copy it, print it, or email it directly. You can also edit it using Greenshot’s built-in image editor by clicking on Edit; this allows you to add text annotations, highlight sections, unnecessary crop areas, etc. When finished editing, click Save at the top of the interface (next to File). That’s all there is to it! Taking screenshots with Greenshot is quick and easy.
Do you want to know how to get rid of check marks on desktop icons? Follow the link
Guide to Take a Screenshot on Windows 11
Using the Print Screen button
To take a screenshot of your entire screen, press the “Print Screen” or “PrtScn” button on your keyboard. It will capture a picture of everything currently visible on your screen and copy it to your clipboard.
Alt” and “Print Screen
To capture the screenshot of the active window, press the “Alt” and “Print Screen” or “PrtScn” buttons at the same time. It will take a picture of only the active window and copy it to your clipboard.
Windows logo key + Print Screen
Press the “Windows logo key + Print Screen” or “Windows logo key + PrtScn” button on your keyboard to save a screenshot as a file. It will take a picture of your entire screen and save it as a file in the “Screenshots” folder inside your “Pictures” folder.
Take and Paste a Screenshot Using Snipping Tool
Snipping Tool is software that comes pre-installed on all versions of Windows after Vista. Snipping Tool can take screenshots of an open window, rectangular area, freeform area, or full screen. To take a screenshot with Snipping Tool:
- Open Snipping Tool by searching for it in your Start Menu.
- In the Snipping Tool window, click “New” in the upper-left corner.
- Use your mouse cursor or finger (if you’re using a touchscreen) to draw around the area of your screen you wish to take a screenshot. Release your mouse button or lift your finger when drawing the snipped area.
- An image of your snip will appear in the Snipping Tool window. If you are happy with what you have captured, click “File > Save As…” and choose where you want to save your screenshot file.
- If you need to make changes to your screenshot before saving it, click “Edit > Invert Colors” or one of the other editing options at the top of the Snipping Tool window.
Are you worried because your remote desktop disconnected because another connection was made? Follow the link to get rid of this problem.
Conclusion
Taking a screenshot is a digital way of “taking a picture” of whatever appears on your computer screen. It can be helpful when trying to document and share an error message, website, or image. Different steps have been discussed in this article to take screenshots on the desktop.
First, open the window that you want to capture. Press Alt+PrtScn. It will take a full-screen screenshot.
Alternatively, if you want to screenshot the active window, press Alt+PrtScn, release both keys, and immediately press Ctrl+V (the shortcut for Paste). You can paste a link to the image in your clipboard into an email or another program.
FAQs
How to screenshot on windows desktop without prtscn
There are multiple ways to take screenshots on the remote desktop if you don’t have a print screen key on your keyboard.
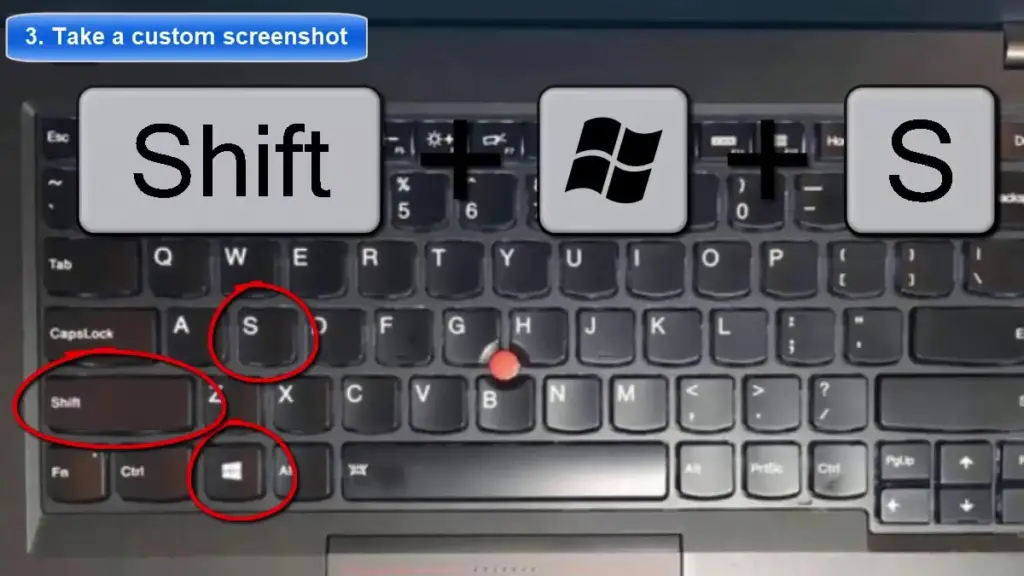
One way is to utilize Snipping Tool. To do this, go to the Start Menu and search “Snipping Tool.” Then, open the program and click “New” to start a new screenshot. You can also use the built-in screenshots tool in Windows 10 by pressing the Windows key + Shift + S. This will bring up a toolbar that allows you to select the type of screenshot you want. Finally, you can also use programs like LightShot or PicPick to take screenshots on your desktop.
How to screenshot on windows desktop shortcut?
To take a screenshot on your Windows desktop, press the “Print Screen” key on your keyboard. It will capture the entire screen and save it to your clipboard. You can then paste the screenshot into any image editing program – like Paint or Photoshop – and save it from there.
How to take screenshots on a desktop windows 7?
In Windows 7, there are two main ways to take screenshots: the Snipping Tool or the Print Screen function.
To take a screenshot utilizing the Snipping Tool, open the program and select “New.” Then, use your mouse to draw a box around the area of the screen that you want to capture. Once you have chosen the area, leave the mouse button and click “Save As.”
Utilizing the Print Screen button to take a screenshot, press the “Print Screen” key on your keyboard. It will copy an image of your entire screen to your clipboard. You can then paste this image into an image editing program and save it. Both methods should produce good results {; however,} some users prefer one over the other.
How to Find Your Screenshot?
The screenshots taken on Windows 10 are automatically saved in the “Screenshots” folder within your “Pictures” folder. To open this folder, go to your “Start Menu > This PC > Pictures > Screenshots.” If you prefer, type “screenshot” into your Windows search bar and click on the “Screenshots” folder when it appears in the search results.

What makes a desktop computer fast

Is 8gb of ram enough for programming
What will happen change hardware keyboard layout?
About Author
Jacob Smith
I am a copywriter specialized in Tech & electronic products. I enjoy analyzing articles focused on PC, Motherboards, Graphics cards, and much more. Previously, I was a contributor to Blogs Hour. In short, my greatest passion is to write about PC and how we can build pc in an easy way, but I have other hobbies such as cinema, geography, sports, and talking with my friends.