How to Install SSD to Motherboard
Since its availability to the consumer market, solid-state drives or SSDs have indeed propelled computer performance to an unprecedented level. it’s most certainly hard to ignore its countless benefits to the computer and learning how to install ssd to motherboard has become essential.
Whether you’re wanting to create a personalized computer or are upgrading an existing PC and trying to give it a better beginning, this article will provide you with all necessary information required in regards to installing ssd on motherboard.
SSD – solid-state drives
a computer’s latest generation of the storage device is called an SSD, or solid-state drive. It frequently takes the place of a revolving hard drive (HDD).
The new generation SSD drive uses non-volatile memory instead of a hard disc like an HDD does. The solid-state drive can access data considerably more quickly and easily than an HDD because of this functionality.
SSDs also give the computer a good number of incredible advantages. Its lack of moving parts gives it an edge over HDD. That implies that it is reasonably resistant to drops and adaptable against data loss brought on by physical forces. Additionally, SSDs do not have read arms or a metal platter that spins. And defiantly makes less noise than HDD.
Over all else, SSDs are effective in providing rapid access to information. To be more specific, the new generation storage devices have access speeds ranging from 35 to 100 microseconds. When compared to the access speed of HDDs, this implies that solid-state drives are 25 to 100x way quicker. This is where using an SSD with an old PC comes into play.
There are various interfaces available for the SSD storage device. mSATA, U.2, SATA Express, SATA, and M.2 are among them. SATA is now the most popular interface type for desktop PC SSDs. The M.2 interface, however, is also widely used.
If you choose a sleeker M.2/PCIe SSD, which I’d highly suggest, it can slot directly into the motherboard with no power or data cables to bother about. Most modern PC cases come dotted with mounting points for 2.5in SSDs, usually in more accessible spots than the 3.5in cages typically used to hold HDDs.
SSD and motherboard compatibility
SATA and M.2 SSDs are the two most widely used hard disc connectors for desktop computers. Therefore, you must do a check to see whether your SSD and motherboard are compatible. Know what kind of disc connector your SSD seems to be using first. Is it a SATA or an M.2 type? Following that, you can check your desktop motherboard to see what kind of disc interface it supports. Here seem to be two ways to examine your motherboard and determine what kind of interface it has:
- Opening your laptop and directly inspecting the motherboard is one way to do that. When you do that, you will undoubtedly observe what kind of disc interface it employs.
- other than that, you might well also look online for the disc interface type on the website of the motherboard manufacturer. Naturally, you’ll require the mainboard’s model name in order to achieve that.
Not all motherboards can support an SSD. The best course of action is to first determine whether the drive and the mainboard are compatible. By doing this, you can see if they will comply.
If you discover that your motherboard’s disc interface only supports SATA after verifying. Does that imply that it won’t support an M.2 SSD? An M.2 solid-state drive with a typical SATA port on a motherboard is always an option. The Peripheral Component Interconnect Express (PCIe) interface can support M.2 drives as well. However, how well your M.2 SSD works relies on its type and capabilities.
On a new motherboard, you could always use an old hard drive.
You can use either of these methods to prevent any problems while attempting to use the outdated hard drive with your motherboard:
- You must keep the hard drive but leave your present files alone.
- You must enter your BIOS to make the necessary changes, which include switching the SATA setup from AHCI to IDE.
- You will then provide the system access to the necessary drivers after that.
- Complete reset and reinstall Windows 10.
Precautions before installing SSD
- Remove the power source’s plug: This may seem obvious, but it’s simple to overlook while you’re thrilled about your new SSD. Unplug the power to avoid electric shock to you or your equipment.
- Take care with your attire: Baggy sleeves, rings, and bracelets can get in the way and cause issues.
- The likelihood that static will damage computer hardware is up for discussion.
- Use an ESD bracelet or static mat to become more watchful and avoid electrical damage to the tiny parts and components of your computer.
- Go over the manufacturer’s guidelines: Some manufacturers provide specific guidelines to guide you.
- Maintain Order: make sure in the computer case that all the connectors and hardware are firmly attached. Prepare your tools, then begin working on your new SSD after deciding where to place it and the cords that go with it.
How to Set Up an SSD in a Desktop Computer
We advise using a data transfer (cloning) application to transfer every one of your files from your old drive to your new hard drive if you are replacing your existing drive.
Make sure to give priority to the safety of the SSD while installing, avoid touching the connectors on the drive to safeguard your new SSD. Keep the SSD closed. You’ll lose your warranty if you do that. Here’s how you can install SSD on your desktop.
- A stationary atmosphere is one you should be working in. Clear your desk of any papers or plastic bags.
- Compile resources: Screwdriver for 2.5-inch Crucial SSDs. Owner’s manual for your device (which will specify the type of screwdriver you need)
- Turn off your system. Disconnect the power connection after turning off your computer.
- Press and hold the power button for five seconds to release any remaining electricity.
- Dispatch the desktop’s case. To learn how to accomplish this, consult the owner’s manual for your system.
- Touch an unpainted metal surface to ground oneself. Your drive and other components are shielded from static damage during installation thanks to this additional precaution.
- Find the storage area. For the precise placement and the size of the bays, consult your owner’s manual. Some hard drives and storage spaces are considerably bigger than a typical SSD. You’ll need a 2.5-inch to 3.5-inch converter to make the SSD fit snugly if this applies to your system. Disconnect all cables and mounting brackets before removing your previous drive.
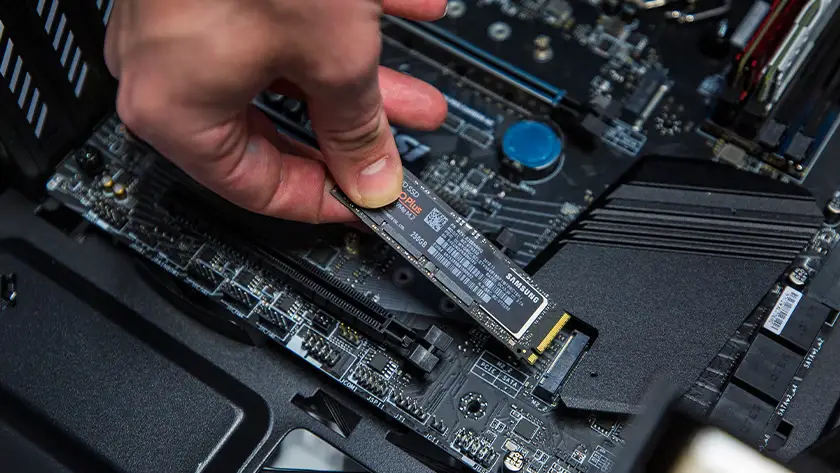
- Connect the SSD to your computer. Don’t try to push the connector; it should fit comfortably and connect easily.
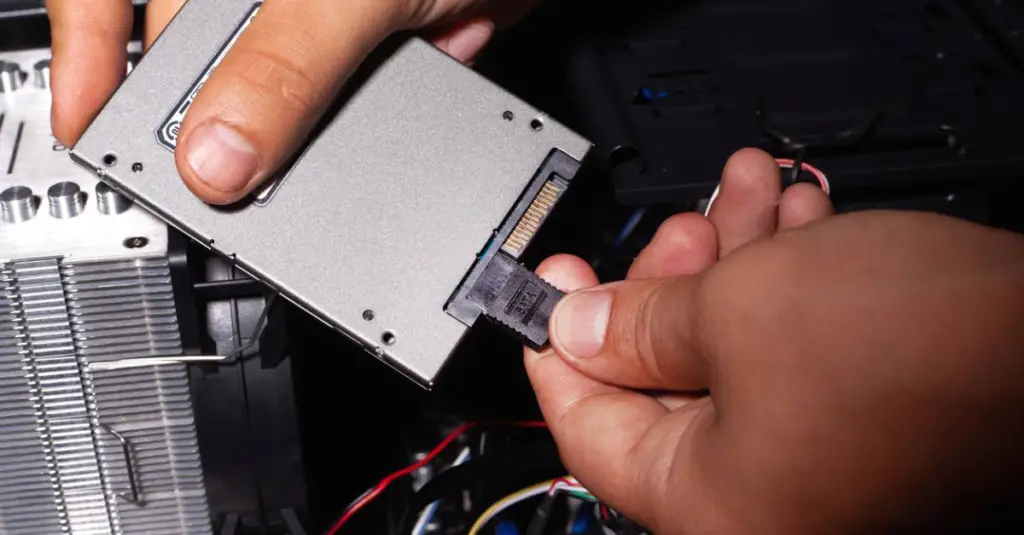
- Use a SATA cable and attach one end of the cable to the SATA connector on your motherboard to install the SSD as a secondary drive (not your primary or boot drive). Connect your Crucial SSD to the opposite end of the SATA wire. Connect your Crucial SSD to the appropriate SATA power line using the power supply for your computer. Consult your owner’s handbook for instructions on how to handle the wires and remove an existing drive (if necessary) before doing either type of installation.
- Put your desktop back together.
- Start up your computer.
Usually, people also wonder about How to install an SSD in a gaming PC, the steps are the same, however like every other installation. be very careful of every move
Types of SSD
2.5in SSD: If you choose a sleeker M.2/PCIe SSD, which I’d highly suggest, it can slot directly into the motherboard with no power or data cables to bother about. Most modern PC cases come dotted with mounting points for 2.5in SSDs, usually in more accessible spots than the 3.5in cages typically used to hold HDDs.
M.2 SSD: NVMe or SATA interfaces are both supported by M.2 SSDs, which connect to your motherboard via an M.2 slot. While M.2 drive slots are prevalent on modern motherboards, you just need to travel back a few chipset generations for them to be completely absent from older PCs. Mind you, NVMe SSDs are so quick and simple to install that they almost make changing your motherboard worthwhile on their own.
How to Install SSD to Motherboard: Conclusion
SSD has become people’s favorite since its arrival and no doubt you should replace your HDD and learn how to install ssd to motherboard , for a faster and easier flow of your desktop
How Long Does a Full Computer Reset Take?
How to check CPU usage on MAC

Why does my laptop keep disconnecting from wifi: Quick Tip 2023
About Author
Jacob Smith
I am a copywriter specialized in Tech & electronic products. I enjoy analyzing articles focused on PC, Motherboards, Graphics cards, and much more. Previously, I was a contributor to Blogs Hour. In short, my greatest passion is to write about PC and how we can build pc in an easy way, but I have other hobbies such as cinema, geography, sports, and talking with my friends.