How to install AMD CPU
The central processing unit, or CPU, is the heart and soul of any computer. The faster and more efficient it is, the better the overall performance of the PC. And you want to do it perfectly because there is so much at stake. Hence due to the remarkable popularity of the Ryzen 5000 generation, AMD is at the top of our list of the best CPUs. The Ryzen 9 5950X is our current top selection for the best AMD CPU due to its outstanding 16 cores, reduced power needs, and great single-core speed. This article will teach you how to install amd cpu
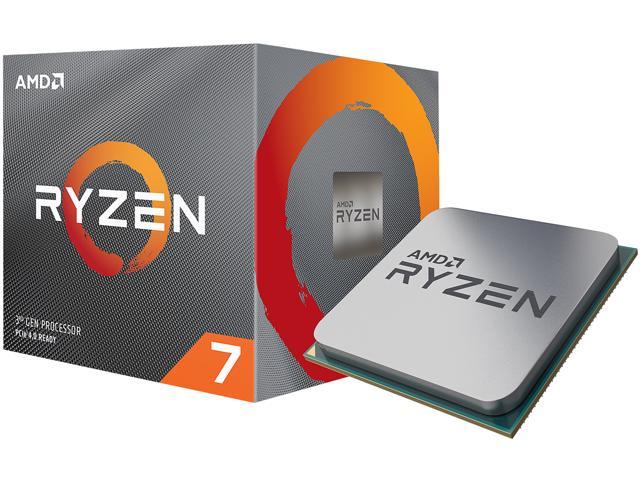
AMD CPU
There are just two options available whether you’re seeking the greatest CPUs for gaming as CPU plays a huge in role, read more about it in our article what does the CPU do in gaming? Before the release of AMD Ryzen 3000 and AMD Ryzen 5000, AMD CPUs were only the best choice in the entry-level and budget segments of the market.
For a couple of cores and energy-efficient clock rates, the most economical AMD CPUs will cost between $40 and $60. A premium gaming CPU costs roughly $500, while the finest midrange CPUs cost between $200 and $350. You may spend anywhere between $600 and roughly $1000 to expedite time-consuming processes like video editing and encoding. For productivity activities like video editing and transcoding as well as gaming, AMD has outstanding CPUs. AMD’s CPUs are superior since they have more cores and threads if your software and workloads can benefit from them.
Install AMD CPU Cooler
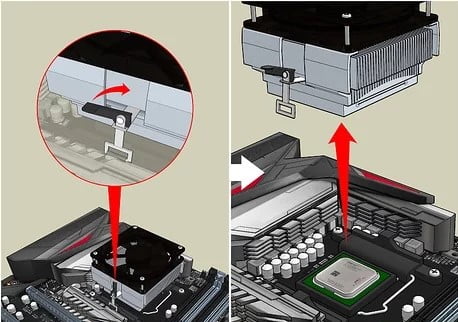
AMD’s CPUs use a different form of the socket (designated AM4) and they might have a different technique of amd cpu mount for heatsinks. Take additional caution while handling them as the pins are located on the CPU rather than the motherboard, which is a significant difference.
Go slowly and cautiously while removing an amd cpu cooler since some coolers have been prone to pull the CPU out of the socket with sticky thermal paste or dirt. while you are at it learn more how to clean cpu cooler
Things you need: Keep in mind that everything is within arm’s access before beginning the installation process such that you shouldn’t have to pause midway through to get whatever you need to finish the installation. You will require an AMD CPU, a motherboard to connect it to, and a cooler. You wouldn’t want anything extra if the cooler already has heat paste on it, as the default AMD Ryzen chiller does. You’ll also need some of your heat paste if it doesn’t.
In case you use the heat paste a little too vigorously, it’s also a good idea to have a lint-free cloth and some 100% isopropyl alcohol on hand. We additionally advise using an anti-static bag for holding electrical components when working in bright areas and you’ll see what you’re doing.
You might also require a screwdriver, depending on your cooler. To ensure you don’t charge your components with static electricity, we also advise you to wear an anti-static bracelet. Make sure your AMD CPU is installed on a non-conductive surface, at the absolute least, and ground yourself before you begin by contacting something metallic, such as the chassis of your PSU or the casing of your computer.
note: The pins are located on the semiconductor itself in AMD CPUs. Take extra caution when touching your processor to avoid bending or breaking any of those, as doing so will render it useless.
- Lift the retaining arm into the vertical position above the CPU socket on your motherboard. Remove the protective plastic piece from the socket if you’re working on a brand-new motherboard. You must take out the previous CPU and perhaps even it’s cooling if you’re upgrading a CPU. See your specific cooler’s directions for further information on it. If you intend to reuse the old CPU, take care managing it when moving it.
- If you’re not, take your new CPU out of its packing and examine the bottom of it. There ought to be a little, golden triangle in one of the corners. This will enable you to position the chip correctly and corresponds to an etched triangle on your motherboard’s CPU socket. Make sure that all of the pins fit snugly into their appropriate ports before inserting them into the socket. If it doesn’t fit perfectly, take it off and try again because it shouldn’t require any force.
- Press the retaining arm back into the socket after the CPU is in position and you are assured that it is installed correctly. It will just require a little pressure, but it shouldn’t be extreme. Trust your gut feelings, and if you’re not sure, check to be sure all of it is correct before leaning further.
- Without a cooler, no AMD CPU will function for very long. The majority of AMD CPUs come with one, but you may also utilize air or liquid aftermarket alternative or read about Which type of CPU cooler contains heat pipes. However, the installation will be extremely particular to your selected cooler, so check the handbook for any instructions you might need to follow. Make sure you can access the back of your motherboard by removing the back panel from your PC chassis since you’ll probably need to do so.
- Nevertheless, any cooler you install requires a method of properly transferring heat from the CPU to the cooler. The thermal paste or heat pad is useful in this situation otherwise your CPU can be severely damaged due to how hot it can get, read more about it in our article coolers come with the paste already applied, so if yours does, you may just follow the installation instructions for your cooler. But you’ll have to apply it yourself if yours doesn’t already have paste on it.
- Heat paste can be applied in a variety of methods, including completely covering a surface, using cross techniques, and squeezing a pea-sized quantity directly in the center of the chip is the easiest and most user-friendly method of all. If you end up with too much, take out the chip and carefully wipe it off with the isopropyl alcohol and lint-free towel. then re-enter the procedure. A little percentage of heat paste conducts electricity. Even if most of it isn’t, it’s wise to avoid getting any of it trapped on the CPU’s back or in any of the socket’s ports. When placing things, be exact and cautious.
- Unless you use a heating pad, just put it over the CPU and make sure it’s the right size and securely attached.
- It is now time to install the cooler itself after your heat transfer material is in place. When it comes to the screws that hold it in place, be sure to use a cross pattern and screw them in gently (by hand, if feasible). Make sure that no one screw is more than a turn or two tighter than the others at any given moment. After that, insert the cooler’s fan header into the corresponding motherboard slot. It will be a three- or four-pin fan header typically marked on the board as CPU Fan or something like that. Consult the handbook for your motherboard if you’re unsure.
- If everything went according to plan during the previous stages, your CPU should now be installed.
- To make sure the CPU is sufficiently cooled, though, we’d advise utilizing a temperature sensor tool like AMD’s own Ryzen Master or HWInfo before doing anything further. If it isn’t, your cooler might not be mounted properly or the screws might not be tight enough.
Is AM4 mounting the same as AM3?

The mounting holes for AM4 differ from those for AM3. As a result, any mounting options from the aftermarket will need an adapter or a new mounting system.
How to install AMD CPU: Conclusion
Particularly at the high end, AMD CPUs often provide the highest overall performance and value for the money. Again, the AMD alternatives provide greater value if you often switch between using a computer for work and recreation.AMD is not doubted one of the amazing choices while looking for a CPU.
Hence learning How to install amd cpu can provide a good advantage while installation. Remember to be careful, if you have all the necessary knowledge and resources at your hands, replacing a CPU is not particularly difficult. There’s a high chance that you’ll spend more time getting ready for the procedure than you will on the actual processor upgrade.
About Author
Jacob Smith
I am a copywriter specialized in Tech & electronic products. I enjoy analyzing articles focused on PC, Motherboards, Graphics cards, and much more. Previously, I was a contributor to Blogs Hour. In short, my greatest passion is to write about PC and how we can build pc in an easy way, but I have other hobbies such as cinema, geography, sports, and talking with my friends.