How to clean CPU cooler in Easy Steps
Cleaning a CPU fan involves the use of the proper tools and procedures. Whether you’re cleaning a CPU fan, a case fan, or a power supply fan, you should keep in mind that frequent cleaning is required to ensure that your computer runs smoothly. For that you must know what cpu cooler you have Your CPU fan might become blocked with dirt if you aren’t attentive, disrupting your entire operation and giving you a lot of hassle and unexpected charges. Hence it is important to learn how to clean CPU cooler.
PCs’ greatest foe is dirt. Because dirt obstructs air movement, the system becomes hotter and less reliable. It also acts as a thermal insulator, causing components to overheat and reducing their useful life. As fans try to keep the system cool, dirt causes them to run faster (and noisier).
Dust, pet hair, and other pollutants are drawn inside the container and settle on every surface. A PC will ultimately grow dirty, even in clean rooms, operating theaters, and other ultra-clean environments. Any dust in the air will be sucked in by the system fans and deposited within the case, where it will eventually cause issues such as overheating. There are several methods for cooling a CPU now. This article will help you find Which type of cpu cooler contains heat pipes.
This article will brief you about cleaning computer fans, it may seem hard but with the right guidance which you will get from this article, cpu cooler cleaning will be absolutely easy. However, there are some safety measures to take before cleaning to avoid accidents:
- Firstly make sure to turn off your computer to save yourself from electrocution.
- Collect all the safety equipment before time, for example, gloves, eyewear etc.
- Pick a place where it’s cool and dry for the cleaning to be effective
- Always check that the wings of the fans are not spinning while you are cleaning, as it may cause injuries.
Preparations of cpu cooler cleaning:

There are a few things you should prepare before you start cleaning computer fans:
- Your go-to cleaning tool is canned compressed air. When cleaning the CPU fan and other computer components, canned pressurized air is always advised. This component is manufactured particularly for cleaning tiny electrical components. Air compressor is available in PC supply and DIY stores. Because canned air for electronics is static-free, it decreases the chance of computer components being damaged. It’s the safest and most cost-effective way to clean CPU fans. If you’re utilizing an air compressor from a can, ensure the CPU is oriented so that dust and grime from the fan can leave easily and not settle in other sections of the case.
- A tiny vacuum cleaner will help to remove dust and grime more quickly. You might also use a little electric vacuum or duster if you have the extra money. This cleaning tool reduces static electricity production, which protects the CPU fan and other computer electronic components. One thing you should be aware of is that utilizing a vacuum cleaner that plugs into the wall may result in electrostatic discharge. If you must use an electric vacuum, make careful to remove the CPU fan from the computer to avoid damage. While you are at it you must look for the Best Cooler for Ryzen 5 5600x is indeed one of the best processors available.
- Cleaning with a moist towel is simple yet effective. If the computer is near smoke, a moist cloth should be used to remove dirt and grime from the CPU fan. For a much deeper clean, disconnect the fan from the CPU and use a moist towel.
How to clean CPU fan:
Here are easy steps to clean cpu fan:
- Step 1: Firstly you will unplug the PC before you start thorough cleaning. Choose a room with a good amount of space. Remove the case’s back panel and vacuum the interior of the CPU. To avoid irreversible damage, do not touch or vacuum tiny connections and jumpers. Blow the dust softly towards the direction of the pipe just so the vacuum may swiftly gather the majority of the dirt. We do not suggest cleaning the part of the computer component with a vacuum. This action can cause static discharge, which can damage crucial electrical components on the motherboard, video card, and other computer components.
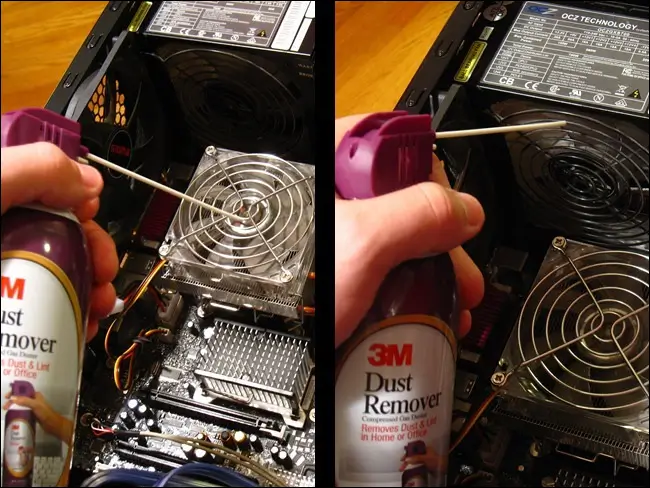
- Step 2: Spray compressed air gently to clear the dust that has accumulated on the CPU fan. It is also critical to clean any dust or dirt that has accumulated on the heat sink positioned beneath the fan. Use canned air to remove dust from the grills as well. To hold the fan blades steady when cleaning with compressed air, use a pencil or pen. You can also use cotton swabs for cleaning.
- Step 3: In order to prevent often cleaning you can move your fan to the cooler location in your room. Appropriate location plays an important and the Arrangement and alignment will also boost your computer’s overall performance. Keep in mind that a fan that is constantly overheating is more prone to accumulate dust, grime, and other particles. An incompetent CPU ryzen 5 3600 cooler may also cause overheating, leading to severe damage to the computer’s hardware.
- Step 4: After cleaning the fan, use a suction brush off the dirt from other computer equipment such as the mouse, cable wires, keyboard, and speakers. You may also use compressed air or a moist towel to clean dirt and grime from various PC components.
- Step 5: After cleaning, examine the fan and its neighboring components before reconstituting your CPU. To eliminate residues of dirt and dust, use a dry cloth or a cotton swab. Before sealing it again, be sure that all components of the inner CPU have been well cleaned.
Conclusion: How to clean CPU cooler:
These simple maintenance techniques can restore your CPU’s appearance and performance! A tidy computer system motivates its users to be more productive. CPU cooler can play a very important role in overall maintenance, hence it is important to learn how to clean CPU cooler. To get optimal results from your pc, stay updated on your CPU usage and keep clean the CPU fan and other computer components every 3 to 6 months.

Do Motherboards Come with Bluetooth?

How to check my power supply wattage without opening?

How much ram needed for mining
About Author
Jacob Smith
I am a copywriter specialized in Tech & electronic products. I enjoy analyzing articles focused on PC, Motherboards, Graphics cards, and much more. Previously, I was a contributor to Blogs Hour. In short, my greatest passion is to write about PC and how we can build pc in an easy way, but I have other hobbies such as cinema, geography, sports, and talking with my friends.