How to update BIOS without CPU
If you’re putting together a new computer and your motherboard won’t start, you may have to upgrade the BIOS. While most motherboards support USB BIOS flashback, hence this article will talk about how to update bios without cpu in simply takes a few minutes.
What is BIOS Flashback?
BIOS Flashback is a function on some motherboards that allows you to run BIOS without a CPU, RAM, or GPU. your CPU may have been over cloaked due to how hot it can get. read about it more in our article.
BIOS flashback is accessible on most recent mid to high-end motherboards. BIOS Flashback is referred to differently by different manufacturers. Here are a few examples:
- This function is known as Q-Flash Plus on Gigabyte motherboards. (Do not confuse it with Q-Flash, which is used to update the firmware from within the BIOS of an existing PC.)
- It’s known as USB BIOS Flashback on ASUS motherboards. (Because they invented the name, other manufacturers do not use it to refer to the functionality.)
- It is known as the Flash BIOS Button on MSI motherboards.
- On ASRock, this function is referred to as the BIOS Flashback Button.
Upgrade bios without CPU :
There can be several reasons to upgrade without a CPU, however, you must know which cpu cooler you have. to learn more, read our article Manufacturers give brief videos (Gigabyte, MSI) and detailed instructions on how to flash a BIOS using a USB, however, if you’re new to this, you may want more extensive instructions to explain a few of things. That’s why I’m here; if you need someone to hold your digital hand through this and guide you on updating bios without CPU.
- Go to Your Motherboard’s Page on the Official Manufacturer Site
You must download the BIOS update file from the manufacturer’s website to use another desktop or laptop computer – never download a BIOS file from anywhere other than the official Gigabyte, Asus, MSI, or ASRock dot com website.
The simplest approach to locate the BIOS download is to just Google your motherboard model.For instance, if you already have that board, put in “MSI B550 Tomahawk” and click on the official manufacturer’s website that appears. That should be the first organic search result (ignore any paid/ad listings that may appear above it).
Check the website again to ensure it’s the same motherboard type you have; some models might have very similar yet slightly different model names, making it easy to look for the incorrect model (for example, some B550 boards include both standard-size “B550” and smaller “B550M” variants) (M indicating Micro ATX).
- Download the curent BIOS version.
Choose the “Support” tab on the motherboard’s page, then search for the BIOS section. The most recent BIOS version will be at the top of the priority list of distinct BIOS versions with release dates. Download the most recent version unless you have a solid reason not to.
if that Beta version was issued within the last week or two, I would suggest against downloading it just yet because Beta BIOS versions may occasionally create troubles. In that case, download the most recent version, but make sure it’s labeled as AGESA 1.0.8.0 or higher if you’re performing all of this for Ryzen 5000 compatibility.
- Extract the Download and Rename BIOS File
When the file is downloaded, you must first extract it because it is a compressed (ZIP) file Open the downloaded location on your desktop, right-click on the zipped folder, and select ‘Extract All.’ Simply unzip it to a location on your system, then open the extracted file/s.
You must now rename the BIOS file. The BIOS download for Asus motherboards would have included an application called BIOSRenamer.exe, which you just double-click to execute and it will rename the BIOS file for you.
You must manually rename the file for Gigabyte, MSI, and ASRock motherboards. Look for the BIOS file, which should be the biggest file in the extracted folder and contain a portion of the BIOS version or model name (ignore the small text file that may have come with the download).
Rename the BIOS file to the following:
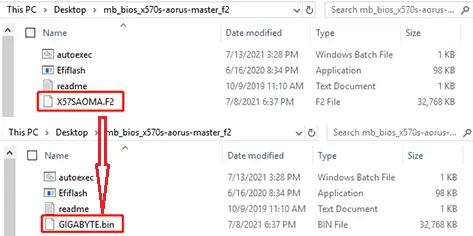
- Rename the file to gigabyte.bin for Gigabyte motherboards.
- Rename the file to MSI. rom for MSI motherboards.
- Rename the file to creative rom for ASRock motherboards.
It’s common for a warning notice to appear when you rename the file, warning that doing so may make the file unstable; simply click yes to indicate you wish to continue changing the file.
Format the USB drive as FAT32 and copy the BIOS file.
Insert the USB flash drive and locate it in Windows file explorer/My PC. Right-click on the drive and select ‘Format.’ You may keep the other choices at their default settings if you choose FAT32 as the format type. The USB drive must be formatted in FAT32 rather than NTFS. If you formatted your disk recently, make sure it’s FAT32 by right-clicking on it and selecting ‘Properties.’ Now copy/transfer the renamed BIOS file to the main root/base directory of your USB device.
Set up the motherboard
Before connecting the power supply to the wall, connect the 24 pin main motherboard connector and the 8 pin processor power connector.
Check that the connectors are properly attached, then plug the power supply into the wall and turn on the switch. Turning on the switch on the back of the power supply will power up the system. also read: Which type of CPU cooler contains heat pipes since Computer CPUs tend to overheat quickly as a result of processing a large number of operations at once?
Insert the USB drive and press the BIOS Flash button.
Insert the flash drive into the correct port on the motherboard’s backside. You do not need to install any more components such as RAM, CPU, SSD, or GPU. Simply ensure that the power connections on the CPU and motherboard are connected to the power source.
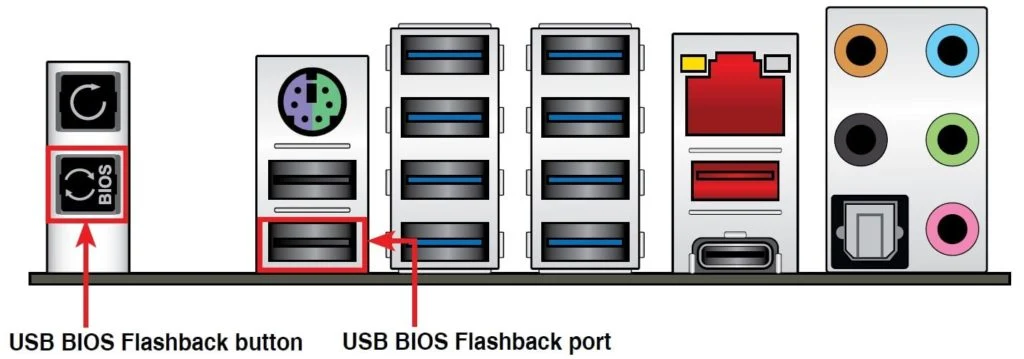
There will be a USB port at the back for BIOS, which should be branded as BIOS or something similar.
Now, somewhere near the port, push the little BIOS Flash button. (On Gigabyte motherboards, it’s referred to as Q-Flash Plus.) The button may not always be located at the back; instead, it may be located directly on the mainboard.
Update and remove USB
It should begin updating once you hit the Flash button. Look for a flashing light someplace near the USB port to indicate that the update has begun; the light should begin flashing or blinking as the update begins.
It will take a few minutes for your update to complete, so be patient and do not remove any parts or switch off the system during this time. if your CPU is turning hot, read our article on why is my cpu so hot
Conclusion: How to update BIOS without CPU:
Although learning how to update bios without CPU might be inconvenient, the procedure is very simple. The steps above will ensure your pc is up and running in no time.

How Long do Gaming Laptops Last – Honest guide 2023
How to Test a Motherboard Without CPU and RAM

Do You Need a PC for a Monitor
About Author
Jacob Smith
I am a copywriter specialized in Tech & electronic products. I enjoy analyzing articles focused on PC, Motherboards, Graphics cards, and much more. Previously, I was a contributor to Blogs Hour. In short, my greatest passion is to write about PC and how we can build pc in an easy way, but I have other hobbies such as cinema, geography, sports, and talking with my friends.